Vector Art Illustrator Export Art Optimized Vs Type Optimized
Read Time: 11 mins Languages:
The purpose of the Relieve for Spider web characteristic in Adobe Illustrator is to optimize graphics for use on a Web site or other screen display, such as a telephone of tablet. The discussion "optimize" refers to the optimum balance between file size and quality. We desire small-scale file sizes then they'll load apace on a Web folio, just nosotros don't want to sacrifice their appearance. Save for Web lets you preview how an optimized vector graphic will look, and then yous can choose the all-time compromise.
In this article, I'll get over the file formats bachelor in Save for Web, and bear witness yous which formats are best suited for different kinds of artwork.
The Save for Web Dialog
You access the Save for Web dialog nether the File menu. Save for Web is almost an awarding in and of itself, and the dialog window takes upwardly nearly of your screen.


You tin choose to preview your artwork in one of three ways. You can only show the original alone. This seems rather useless, however, considering yous'll probably want to encounter how the graphic will await once it's optimized. You tin show the optimized preview lonely, or you lot can choose two-Up, which volition give you side-by-side previews. You can click on either pane to adjust its settings. In the prototype below, the original is on the left, and the optimized version (in this case, as a GIF) is on the correct.


You lot can adapt the size of the preview in the drop-downwardly card on the lower left, and you can also use familiar keyboard shortcuts like Command/Control-0 to fit the artwork in the window, or Command/Command-plus or minus to increase or decrease the magnification.
Clicking the Preview button will open the optimized graphic in your default browser. If yous want to see how information technology looks in other browsers, y'all can add more than by clicking the petty world icon next to the Preview button.


One of the most of import sections of the Relieve for Web interface is the file size. Under each preview is the file type and its respective size. Then in the image below, the original EPS is on the left, with a file size of 2.44M. The optimized GIF is on the right, with a much smaller file size of about 39K. Since the goal of Save for Web is to find the ideal balance between size and quality, you'll be looking at these numbers ofttimes.


The File Formats
GIF (Graphics Interchange Format)
GIF is one of the oldest and most-used formats on the Web. It's ideal for images with areas of flat color, as in this example. The GIF color infinite is Indexed colour. This allows you lot to specify an exact number of colors in the color table, so you can use only the ones you need, thereby reducing the overall file size.
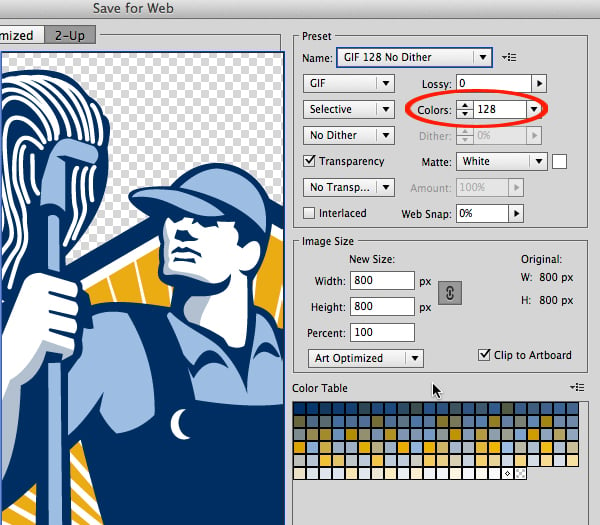
The save for Spider web dialog has several GIF presets. Choose different settings and keep an centre on the image and the resulting file size. In the image beneath, I've used a preset that has 128 colors. As y'all can see, the image looks good and the file size is 37.72K.

In the next example, I've called merely 8 colors. Yous tin run across the file size is at present 23.3K. It's a meaning savings, but the prototype is starting to lose quality. The edges are rough because there aren't plenty colors to fill in the transitions between each shape. Even though at that place are simply five colors in the illustration — three shades of bluish, yellowish and white — Illustrator uses more than colors in the anti-aliasing procedure so the edges and curves appear smooth.


GIF colors tin can exist restricted to those that are considered "Spider web rubber". This is not really a business these days, now that monitors tin can display millions of colors, merely there was a time when designers were advised to use merely the 216 colors that were shared by Windows and Macintosh systems. And so if you wanted to ensure your graphic looked the same on each platform, you lot would limit its colors to that palette. In the case below, I've used the Spider web Palette preset, and you can see how the light blue colour has shifted to a greenish blueish.


A GIF tin can exist blackness-and-white, and information technology uses something called dithering to simulate a continuous tone. You tin can choose different dithering methods, simply they all accept a decidedly 1980's wait to them.


GIFs support one level of transparency. This means each pixel is either solid or completely transparent – y'all wouldn't use a GIF for an image with a soft shadow or transparent gradient.


Next to the Transparency tick box you can choose a matte color. This will add together a slight outline around the prototype in that colour. And so if you lot're placing the GIF on a colored background, you can select that aforementioned color as the matte color. That manner the transition between the graphic and the background will appear smooth.


You can choose to clip the image to the artboard, which volition make the pixel dimensions of the saved graphic the aforementioned equally the Illustrator artboard. Or you lot tin cull to leave this box unchecked, which will clip the image to the premises of the vector graphic. This is the setting y'all'll probably use most of the fourth dimension, since in that location's no demand for extra transparency around the epitome. The resulting file size will be smaller also.


In the Image Size section you tin can cull to reduce or enlarge the optimized graphic. The nomenclature is a bit ambiguous here. Information technology'southward non referring to the file size of the image in kilobytes, only the pixel dimensions, expressed equally width and height.
This is where Illustrator has an advantage over a raster or pixel-based application like Photoshop. If y'all overstate the image for optimized output, Illustrator uses the vector information in the file for the enlargement, and the resulting graphic is sharp and polish. If you lot were to utilize Relieve for Web in Photoshop and attempt to overstate a raster image, however, the enlarged artwork would look fuzzy.
Beneath the Paradigm Size fields is a drop-down bill of fare where you can select the method of optimization. If your graphic is text-heavy, you might cull Blazon Optimized. In the examples beneath, y'all can see the departure between the paradigm that is optimized and one that has no optimization applied.


The Colour Table contains swatches for each color that will be contained in the optimized graphic. You lot can really double-click on a swatch and change its color. Here I've changed the xanthous to pink. You tin can meet the swatch is at present one-half yellow and half pink in the Colour Table, and when you hover over information technology, the tool tip gives yous the RGB breakdown for the original and for the new color. This could be useful if you are saving a series of the same prototype, and yous want one chemical element to be a different colour in each version. By replacing the colour in Save for Web, you don't have to change the original vector.


Beneath the Colour Table is a series of icons that let you farther accommodate the color. When you select a swatch, yous can and so make it transparent, confine it to a Spider web condom color, lock it or delete it. A diamond inside a color swatch indicates a Web safe colour, and when you lot hover over it, the hexadecimal code is displayed.

There are a few more settings and practices you can use with GIFs. For example, yous can choose to interlace the GIF, which will load the image in multiple passes in a browser. This method was adult back in the days when near people were on slow dial-upwardly connections. An interlaced graphic appears to load faster than it actually does. At that place's not much reason to employ it today, especially with a relatively small file like a GIF. The other options in the GIF settings are either highly specialized, or somewhat outmoded, and then I won't spend more than time on those. Permit'south motility on to the other formats!
PNG-8 (Portable Network Graphics, 8-bit)
The PNG (some people say "P-N-K" and others pronounce it "ping") format is often a better alternative to GIF. PNG-8 is similar to GIF in that information technology uses 256 colors, supports one-bit transparency, and tin can use dithering. The "eight" means that this is an viii-bit image. The principal difference between the ii is the way in which they compress the image information. GIF uses a "lossy" method, which ways some of the information is discarded (or "lost") to achieve a smaller file size. The PNG method is lossless, but because of its compression algorithm, the resulting files size is often significantly smaller than a GIF. So why would you even utilise a GIF, if PNG is meliorate? Well, not all browsers support the PNG format (I'm looking at y'all, Internet Explorer 6!). But equally more people upgrade to newer browsers, this isn't as much of an issue. And so go ahead and try PNG-8 on images that would normally call for a GIF. Most of the options for PNG-viii are the same as those for GIF in the previous section.
JPEG (Articulation Photographic Experts Grouping)
JPEG was originally adult to compress photos, and thus is best suited for vectors with continuous tones. JPEGs are 24-bit, and thus back up well over 16 million colors. JPEG compression is lossy, and the image will degrade if you try to compress information technology too much. In the image below, you can showtime to run into blocky JPEG "artifacts," which are undesirable. Choose a higher quality setting until you get a better-looking graphic with an adequate file size.


Y'all can cull to load the image in multiple passes by selecting Progressive, and you lot can blur the image to mitigate some of the artifacts. Neither of these methods is platonic, nor actually necessary. They are throwbacks to the days of dial-up connections and slower machines.
Every bit with GIF and PNG-viii, yous tin specify a pixel dimension in the Prototype Size field, select the optimization method, and choose whether to clip the paradigm to the artboard. At that place is no color table, because JPEGs are in RGB mode, not Indexed color.
JPEG is well-suited for images with continuous tone, but it is not so slap-up at graphics with larger areas of flat colour. In the example beneath, the JPEG is on the right. Even at the highest quality setting, information technology looks worse than the GIF, and is showing some artifacts.


PNG-24
PNG-24 is, every bit the proper name suggests, a 24-flake epitome. In some ways, it combines the best of both worlds of GIF and JPEG, and is a superior format. Like JPEG, it can support millions of colors. PNG-24 can also contain alpha transparency, then it can be used for graphics that take blurred edges and transparent shadows. All those colors and transparency come up with a price, withal, in a larger file size. In the example below, yous can see that a JPEG saved on the high setting is almost 22K, whereas the PNG is about 95K. Simply the transparency allows you to place the PNG-24 graphic on a patterned or textured background. And so if yous need that kind of flexibility, PNG-24 is the way to go.


Decision
I promise you lot have a better understanding of the file formats in Illustrator'due south Salvage for Web feature. Each format has its advantages and disadvantages, merely with some careful testing, you can notice the best settings for your artwork. This is a powerful tool and can make your Web work flow much easier and faster. One time you decide the ideal settings for your images, you can save them equally a custom preset. Then you can batch process entire folders total of similar images in no time.
Vector graphics in this article were purchased from GraphicRiver: Janitor vector, pumpkin vector.
Did you find this post useful?

Source: https://design.tutsplus.com/articles/understanding-the-different-file-types-in-adobe-illustrators-save-for-web--vector-16399
0 Response to "Vector Art Illustrator Export Art Optimized Vs Type Optimized"
Post a Comment